Pages

Friday, July 26, 2013

Crying Out for Colour

This room certainly is crying out for colour and it needs help fast!
What colour scheme would you like to see for this space?

Pick your favourite out of the four options below, cast your vote in the comments and I'll get to work on the most popular one so this sad room can shine!


Saturday, April 20, 2013

E-Decorating Giveaway!


Congratulations!
Congratulations to Nicole F. of Port Perry, Ontario!!
She is the winner my Free Virtual Decorating Package

I'm looking forward to working on her new bedroom design 
and I'll post the final result when it's all done!

Friday, March 22, 2013

Bathroom Counter Makeover

My Faux Granite Counter Makeover

My downstairs powder room was in desperate need of a makeover and, as usual, I needed a simple and inexpensive way to make it look great! Later I will do a post on all that was done, but for now, I'm going to focus on the countertop. It was a boring grey laminate, but a simple DIY project has transformed it into a sleek, glossy chocolate granite! You'll have to excuse the excessive amount of photos, but, for this project, I think they're warranted. 
I used the Giani Granite Paint for Countertops in Chocolate Brown. The kit costs around $80 and you can get it at Wal-Mart or a local paint and decor store. The kit comes complete with everything you need, with the exception of a small roller tray, fine grit sandpaper, a small artist's brush and painter's tape. You also get a sheet of heavy, black construction paper to practice on, so definitely make use of it!
And, the process is so simple, as long as you can hold a sponge and a brush in your hand, you're good to go!
This was my countertop before. It's pretty clear why it needed a bit of a 'WOW' factor.

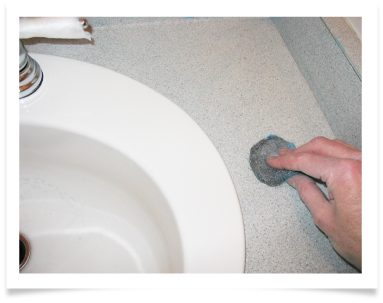
The first step is to clean your counter well so the primer will adhere properly.
I used a steel wool scouring pad--you know the one :)

RINSE WELL! I rinse with a sponge about 3 times to make sure all the cleanser residue was removed. 
**Also make sure you remove all the caulking from around the sink and counter top edges**

Carefully mask off the entire area.
There is no such thing as overkill here, trust me!

Roll on the black primer

Here are the 3 colours that came with the Chocolate Brown Kit

You're supposed to start with the medium toned colour fist, but I started with the lightest. Here's my first layer. I attempted to try some veining, but you'll notice that I sponged over them throughout the process--I just wasn't happy with them. 

After the second colour was applied

After the third colour was applied

It was a little lighter than I wanted, so I added more of the dark brown

It looked really good, but I was after a softer look, so I just kept dabbing and blending the colours until I was happy with the result

The last step is to apply the topcoat. I wanted a smooth finish, so I lightly sanded with 400 grit sandpaper before I put on the topcoat. You're supposed to use 600 grit but the 400 seemed to work well too. If you decide to do this, make sure the you remove ALL sanding dust before applying the topcoat. To ensure the smoothest finish possible, I applied 3 coats of topcoat and sanded between each coat.
*Please ignore the handles--they WILL be changed!


I found it hard to get long even rolls during the topcoat process, so I would remove the sink if possible.
Close up (still need to caulk around the sink)

I'm quite happy with the results and am already trying to think of what else I can 'Granite-ize'!


Thursday, March 7, 2013

Make Your Own Carpet Runner

   One of the first major DIY projects I did was rip out the original carpet in my living room, dining room and hall and install hardwood flooring. It was a big project but well worth the result. It did, however, create a problem with my stairway, which was completely covered with that same old drab grey carpet. So there I had it; another project begging to be started.
    I needed an inexpensive way to update my stairs and I've always loved the look of runners, so I set to work and removed all the carpet, sanded and painted the builder stairs, and refinished the handrail, posts and spindles. And there it all sat for a very long time. I'm too embarrassed to tell you how long, so I won't!
   Well, I was 'encouraged' recently to finally get it done and set about looking to find some sort of remnant runner that would do the trick. But, any remnant that was remotely long enough, was pricey and your typical decorative, floral pattern, which is not what I was after.
   I realized pretty quickly that I was going to have to make something up on my own. So off I went to find a carpet remnant. I was lucky enough to get my hands on one for $50 (talked him down from $70--not bad, huh?) Then I really hit the jackpot and came across a discount fabric and notions store and got corded pillow trim to do binding for 50 cents/yrd!!
   The total cost to complete my runner (enough to cover 11 steps) was $61, including 'no-slip' sheets cut to go on each step.

Here's how I did it:
Buy a remnant large enough to cover your stairs, keeping in mind that you can have seams under the step, at the top of the riser, if needed. 
Cut the remnant into strips the appropriate width (I went with 26").

  • Low pile and berbers work best for runners and make installation easier because they aren't too bulky.
  • Take the time to make sure your cuts are straight by drawing a cut line to follow on the back of the carpet. 

Trim off any stray fibres to ensure that you have a good, clean edge.

Cut your corded trim into two pieces measuring the full length of your runner.

Hot glue the trim to the very edge of your runner doing 8"-10" sections at a time.

Also using a glue gun, secure the band of the edging to the backside of your runner.


The finished runner, and........

INSTALLED!

Friday, February 8, 2013

Interior Decorating: Understanding the Basics

People often struggle to get started on a decorating project. They see rooms on tv and in magazines that they like but don't know how to go about getting those looks for their own spaces. There are a lot of things to consider when it comes to decorating your home and it can be overwhelming. By breaking down the components of design and looking at them individually, you can clear all those jumbled thoughts and simplify the process; making it easier to make decisions and get started on your way to your dream room!

CONSULTATIONS
Consultations are vital to the process of interior decorating. They are where the designer gets to know the client's tastes, lifestyle, goals, likes, dislikes and intended use for their space. Sometimes, all a homeowner needs is a launching pad to get them guided in the right direction and they can venture into their project on their own after getting a little guidance and suggestions.

SPACE PLANNING
You can have the most beautiful furniture and accessories and still not be happy with a room because it doesn't 'work' the way you'd like it too. Proper furniture layout is key to a well designed space. When planning furniture arrangement, function and visual balance need to be addressed: Is the seating arrangement set up well for conversation? Is there a good view to the tv? Is there a focal point and good flow to the space?

PAINT SELECTION AND WALL COVERINGS
What goes on your walls does more than just tie a colour scheme together. Paint, wallpaper and other materials can enhance mood, balance a space, and add texture and contrast. They are the largest surfaces in a room and need to be paid close attention to.

MATERIALS AND FINISHES
The materials used for flooring, back splashes and countertops are the more permanent elements of a design and need to be chosen wisely. The materials and finishes used can either make these elements focal points in a room or neutral backdrops. Well chosen finishes should be able to stand up to future decorating changes.


FURNITURE AND FABRIC SELECTION 
Furniture style and fabric choices set the tone in a room's decor and have to meet the requirement of both fashion and function. There are so many options available and the right choices will complete the look of the design and provide comfort and function at the same time.


ACCESSORIES SELECTION
The finishing touches to every project, the accessories can bring in the 'WOW' factor needed to make a room truly sparkle. They should reflect your personality, provide impact and create interest.


DESIGN IMPLEMENTATION
This is where the real work begins. Your decorating goal may be as simple as changing paint colour and accessories or as involved as removing walls and installing floors. Whatever the scope of the project, a well implemented design proposal results in easier, less stressful decision-making, runs smoother and, finishes on time and on budget.

COMPUTER RENDERINGS
This is a new trend in decorating but one worth considering. 3D renderings help you to truly visualize what your finished design will look like before you commit to a design. Removing the guesswork allows for easier decision-making and eliminates possible disappointment in the end.

Saturday, February 2, 2013

E-DECORATING GIVEAWAY!

It's that time of year again when I give away a free e-decorating package!
If you've been thinking about redecorating a room in your home, but just don't know where to begin, a virtual decorating package will give you just the start you need.
TO ENTER, GO TO
Be sure to get you entry in by March 31, 2013.

Thursday, January 3, 2013

Don't Get Your Garland in a Knot!

How to Store Your Beaded Garland
I bought a big plastic tube of beaded garland a few years back, and when I took it out to hang on my tree,  it was just one big frustrating knot--ALL 100 FEET OF IT!!!
I figured I had only two options: untangle it or pop some corn, get a needle and thread and start stringing. I, of course, opted to untangle the pretty, shiny string of beads. Five hours later (no, I am NOT exaggerating), I had what seemed to be a never ending string of gold beads that continually wanted to get re-tangled. I ended up cutting the garland into more manageable lengths of about 25' or so and draped them on my tree.
When the holidays were over and it was time to take the tree down, I was taking the garland off and it all came flooding back. Yikes! I did NOT want to go through the untangling process again next year.

Here's how I store my beaded garland now 
to avoid being thrown into Grinch-mode come tree decorating time:


If your garland is really long, cut it into more manageable lengths of 20-25ft.
Cut some cardboard sheets (corrugated seems to work best) of about 1ft x 2ft. 
Along 2ft edges of the cardboard, cut slits from end to end about 1/4" long and 1" apart.
As you take your strand of beads off the tree, wrap them around the cardboard panels securing the string between the beads into the slits. 
Voila! They're not going anywhere and you're not going to go crazy for 5 hours trying to untangle them the following year!